Wednesday, April 25, 2012

Iron Sky

I don't normally do this but my boyfriend is a movie freak and Iron Sky has been catching our attention recently! Super excited. It will be out in Australia on the 10th of May 2012! Perfect! It's our anniversary too :)
A blub about the movie!
As World War II came to a close, several German scientists deployed Nazi spaceships to the dark side of the moon to establish a military base from which they could once again strike out at the countries of Earth. Now, in 2018, they’re coming back.


How cool is this!


If you have not, you better check out the trailer!

So if you are in Melbie, See Iron Sky at your nearest Hoyts. Mine is at Melboune Central! Don’t forget to check out their Xtremescreen, Director’s Suite and the Bean Bag Cinema too!

Monday, February 13, 2012

Chocolate Mousse Cheesecake

I picked this up from pinterest and have been finding a prefect occasion to make this. I planned to make it for Jin Xiu's birthday but it was way to last minute (it takes a good all day to make this- or overnight) but it couldn't wait. I wanted the cake to pop right out of the computer screen if I have to. 

So here is the recipe, taken from a fantastic baker blog: http://www.mangiodasola.com/
I think if you have a great recipe of oreo crust cheesecake, chocolate mouse and chocolate ganache; put them together and viola! 

Good luck. It's worth the effort :)


Chocolate Mousse Cheesecake


Layer 1: Oreo Cookie Crust

30-32 Oreo cookies (or chocolate sandwich cookies) for a high crust
4 Tbsp unsalted butter (1/2 stick), melted
1-2 tsp espresso powder (optional)

Crush cookies in a food processor or in a ziploc bag with a rolling pin or mallet. In a bowl or food processor, pour melted butter on top of the crushed cookies and add the espresso powder (optional), and mix or pulse well. Place the oreo mixture at the bottom of a springform pan. Smooth out the mixture with the bottom of a measuring cup or glass. Wrap the bottom of the pan in a double layer of aluminum foil. Place the crust in the freezer while you make the cheesecake.

Layer 2: Tall & Creamy Cheesecake

For the cheesecake:
1 pound (two 8-ounce boxes) cream cheese, at room temperature
2/3 cup granulated sugar
1/4 teaspoon salt
1 teaspoon pure vanilla extract
2 large eggs, at room temperature
2/3 cup heavy cream (or sour cream or combination)

Put a kettle or pot of water on to boil. Preheat the oven to 160C.

Working in a stand mixer (or large bowl with hand mixer), preferably fitted with a paddle attachment, beat the cream cheese at medium speed until it is soft for about 4 minutes. With the mixer running, add the sugar and salt, and continue to beat another 4 minutes or so, until the cream cheese is light. Beat in the vanilla extract. Add the eggs one by one, beating for a full minute after each addition to yield a well-aerated batter. Reduce the mixer speed to low, and stir in the heavy cream or sour cream. 
Put the foil-wrapped springform pan in the roaster pan, and pour in a few cups of the hot water in the pan around the springform pan.

Give the batter a few stirs with a rubber spatula, just to make sure that nothing has been left unmixed at the bottom of the bowl, and scrape the batter into the springform pan. The batter should fill only half of the pan. Put the roasting pan in the oven and pour the rest of the boiling water into the roaster to come halfway up the sides of the springform pan. 
Bake the cheesecake for 1 hour and 15-30 minutes, at which point the top will be browned (and perhaps cracked) and may have risen just a little above the rim of the pan. Turn off the oven's heat, and prop the oven door open with a wooden spoon. Allow the cheesecake to luxuriate in its water bath for another hour. 


After 1 hour, carefully pull the setup out of the oven, lift the springform pan out of the roaster—be careful, there may be some hot water in the aluminum foil—remove the foil. Let the cheesecake come to room temperature on a cooling rack.
When the cake is cool, cover the top lightly and chill the cake for at least 4 hours or overnight. Make the mousse once the cheesecake has cooled.


Layer 3: Mousse au chocolat/French Chocolate Mousse

6 ounces semisweet baking chocolate, chopped 
3 tablespoons unsalted butter, softened
2 tsp espresso powder (added to intensify chocolate flavor, optional)
3 eggs, separated
1/2 teaspoon cream of tartar
1/4 cup plus 2 tablespoons sugar
1/2 cup heavy cream, cold (do not use half-frozen cream; the whipped cream will curdle)
1/2 teaspoon vanilla extract
Place the chocolate and butter in a heatproof bowl, and place over a saucepan containing barely simmering water (or use a double boiler). Melt the chocolate and butter together and stir with a whisk until smooth. Add in the espresso powder. Remove from heat and cool slightly. Add the egg yolks to the chocolate, 1 by 1, beating with a whisk until incorporated. Set aside.
In another bowl, beat the egg whites until foamy. Add the cream of tartar, and continue to beat. Gradually whisk in 1/4 cup sugar, and continue beating until stiff peaks form.
Beat heavy cream in a chilled bowl with chilled beaters until it begins to foam and thicken up. Add the remaining 2 tablespoons sugar and vanilla. Continue to whip the cream until it holds soft peaks. 
Gradually and gently fold the egg whites into the chocolate mixture to lighten it. Then, delicately fold in the whipped cream. Take care not over work the mousse but make sure you blend in the cream well. Place the mousse on top of the cooled cheesecake while still in the springform pan. 

Cover the mousse cheesecake with foil, being careful to not let it touch the mousse. (If your springform is too small for this, just use less mousse in the cheesecake and instead eat them in ramekins while you prepare the ganache!) If making the ganache immediately, place mousse-covered cheesecake in the freezer as you make the ganache (the cheesecake should NOT be in the freezer for more than 30 minutes). Ifmaking the ganache later, place the cheesecake in the refrigerator for a few hours. Either way, the ganache must be cool before you can pour it on top of the cheesecake. 


Top layer: Espresso Ganache

1/2 cup heavy cream
4.5 ounces bittersweet chocolate, chopped (I used Callebaut semi-sweet and milk chocolate)
1 tsp espresso powder (optional)
1 1/2 tsp dark rum (I used vanilla extract instead)

Heat the cream in a small sauce pan over medium heat. Heat it up just BEFORE it boils. Place the chocolate in the cream, and remove from heat. Stir the mixture until smooth. Stir in the espresso powder and rum or vanilla extract. Allow the ganache to cool for about 15 minutes before pouring the mixture on top of the mousse cheesecake.

Release the springform pan. With an offset spatula, smooth the ganache while starting at the center of the cake and working outward. (I did a "crumb" crust by placing a thin layer of the warm, not hot, ganache on top, allowed it to cool in the freezer for 30 minutes, then I poured more on the cheesecake after releasing the springfrom pan so that it could pour down the cake.) Don't do exactly what I did, though. Just pour ganache on top once it has cooled. Keep in mind that the cold temperature of the cake will cause the ganache to firm up quickly, and you may have to pour more on top.

Save the rest of the ganache for decorations (if you whip the ganache when it's cold, you can pipe a beautiful decoration) or save it for something else.


Sweet potato steamed buns

 Sweet potato buns are the same texture to 'bao'. However, unlike 'bao', these contains coconut milk and egg as well as without a filling inside. I think this recipe is versatile. If you don't have sweet potato give yam a go.
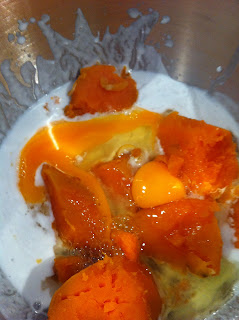
I have been making this recipe for a few times. It is easy but may take half a day to make. Make sure you steam the sweet potato first as it might take a while. Run a fork through it and you are ready to peel them. Just be careful and not burn your fingers. :)  

 Leaving the batter to rest is important to get that soft airy texture to the buns. I was invited to a friend's Chinese New Year dinner and made this to bring along for the great fun night. 


 Sweet potato steamed buns
Ingredients A:
3 table spoon plain flour
2 tablespoon instant yeast
1 table spoon caster sugar
3 tablespoon warm water

Ingredients B:
200g sweet potato (steamed and peeled)
180gs caster sugar
1 egg
150ml thick coconut milk

Ingredients C: 
200g plain flour
1 teaspoon double action baking powder


1. Mix all ingredients (A) together and leave it to ferment for 5-10 minutes.


2. Combine ingredients (B) and the fermented mixture into a mixture. Process till fine. Then add ingredients (c) and continue to beat until the batter is formed. Leave the batter to rest further for 1 hour.


3. Stir the mixture well before scoop into the baking paper cupcakes. Steam over high heat for 20 minutes.  


Vanilla melting moments- butter cookie with butter cream


I have been wanting to try to make cookies for a change. 
Jin Xiu has been really busy at work at at times is having late lunch. So I thought it would be nice if I make something for him to munch at work. Little did I know that I pack a week load of cookies for him, he finish them all in a day- that is what he said, but I think he got all of them in one sitting! 

Vanilla melting moments

250g butter, soften
1 teaspoon vanilla extract
1/2 cup (80g) icing sugar
1 1/2 cups (225g) plain sugar
1/2 cup (75g) cornflour

Butter cream
160g butter
1 1/2 cup (225g) icing sugar
2 teaspoon grated lemon rind
2 teaspoon lemon juice

1. Preheat oven to 180C fan forced. Line tray with baking paper.
2. Beat butter, extract and sifted icing sugar in small bowl with electric mixer until light and fluffy. Stir in combined sifted flours, in two batches. 

3. With floured hands, roll 2-level-teaspoon of mixture into balls. Place balls about 3 cm apart on trays; flatten slightly with a floured fork.

4. Bake biscuits about 15 minutes or till a pale-straw colour- might need to watch it on the second or third batch, mine had a slight browned (cooked) colour. So maybe adjust temp or pull out from the over earlier.
Stand biscuits on tray for 5 minutes. Transfer to wire racks to cool.

5. Meanwhile, make butter cream. Beat butter, sifted icing sugar and rind in a small bowl with electric mixer until pale and fluffy. Beat in juice. 

6. Sandwich biscuits with a teaspoon of butter cream.


Tuesday, January 24, 2012

Pineapple upside down cake

I needed to bake a cake for Jin Xiu's birthday and I found a recipe for a cheesecake which would take 2 days to make. 
I had to find another recipe which was quick and something less sweet and chocoloately that he might like. 
He  LOVES butter.
He LOVES pineapple.
Perfect. 

An easy peasey quick upside down pineapple cake. 
It is rich and dense rather then a spongy texture. I think the buttery flavor is a winner for this one. 
I was using a spring form pan so just be aware that if you do, make sure you wrap the inside bottom with layers or baking paper, and have the cake pan on a tray just in case the caramel will start oozing out. Which it did. 

Pineapple Upside Down Cake


1 cup of dark brown sugar
1/2 cup of unsalted butter
1 can of pineapple slices

1 1/2 cups all purpose flour
6 tbs cake flour
6tbs ground almonds
3/4 tsp baking powder
1 3/4 sugar
240g butter
4 eggs
1tsp vanilla extract
3/4 sour cream
salt


1) To make caramel topping. Melt brown sugar and butter in saucepan on medium heat until mixture is bubbly. (Stop stirring when sugar starts to melt). Pour mixture into a pan (with high sides). Arrange pineapple slices in a single layer on top of the caramel mixture. Leave aside.

2) Preheat over to 160C.
3) Whisk flours, almonds, baking powder and salt. 
4) In a separate bowl, beat sugar and butter until light. Add eggs one at a time, beating after each addition. Beat in vanilla and add dry ingredients alternately with sour cream in 2 additions. Beat well after each addition. Pour cake batter gently over caramel and pineapple in pan.   
5) Bake cake for 1 hour to 1 hour 15 minutes, or till skewer comes out clean. 
6) Cool pan for 10 minutes. Turn cake onto a platter. Serve warm. 

A happy birthday boy!

And we had it with ice cream. Jin Xiu's cookie and cream fav flavour! Weird but delish!

Passionfruit Cake

I was passing along Victoria Market when I noticed that they were selling 6 passionfruit for $2!
Better news, Bianca was popping along and I needed to bake her a cake. 
I found this recipe off bestrecipes.com  and tweak it a little as usual. I don't like too much of butter and sugar so I tend to cut them to a third anyway. 
The recipe requires 4 pulp of passionfruit which including the seeds. Surprisingly the seeds gave a crunchy texture and we all enjoyed it.  
This cake has icing on the top. 
And if you don't like icing, I think with just the cake and have a passionfruit coulis will do a great trick too. 


Passionfruit Cake

125 g butter
1/4 cup caster sugar
2 eggs
2 cups of self-raising flour
1/2 cup milk
4 pulp of passionfruit (with seeds)

Icing:
1 tablespoon of butter
1 1/2 cup of icing sugar
2 pulp of passionfruit, sieved  (without seeds)

1) Preheat oven to 180 C. Brush a round 20cm cake pan with butter and line the sides with non-stick baking paper. 
2) Cream butter and sugar. Add in the eggs to combine. 
3) Add in sifted flour alternating it with milk. Then add passionfruit pulp until all combined.
4) Pour in cake pan and bake for 40 minutes or until skewers into cake comes out of clean. 
5) To make icing, Whisk butter and icing sugar till combined. Then add sieved pulp.


6) When cake comes out from the oven, using a skewer, poke around the cake. When icing is poured on the cake, this will help the icing absorbed into the cake easily. 


Sunday, January 1, 2012

sticky date pudding with butterscotch sauce

winter comes along and I crave for sticky date
I find it really hard to hunt for a good pudding. 
some will be to floury or too dense that half way through your slice, it gets overwhelmingly rich.
My mum flew over the other day with a kilo (yes! 1 KILO!) of dates. 
I have been telling her on the phone that I needed some dates- having the dates here in Melb are dry and not as juicy as the one we have at home. Little did I know that she had hauled in 1 kilo of dates for me. So now, I have dates all over my fridge. :(
So here it is, a slight adaptation. I have reduced the sugar slightly. 


Sticky date pudding
270g (1 1/2 cups) deseeded dried dates
312ml (1 1/4 cups) water
1 teaspoon bicarbonate of soda (baking soda)
60g (1/4 cup) butter, roughly chopped (we use salted butter)
2 large eggs (we use eggs with a minimum weight of 59g)
1 teaspoon (5ml) vanilla extract
188g (1 1/4 cups) self-raising flour
150g (2/3 cup, firmly packed) brown sugar

Butterscotch Sauce
180g (3/4 cup plus 2 teaspoons, firmly packed) brown sugar
300ml (1 cup plus 2 1/2 tablespoons) cream (35 to 40 percent fat)
25ml (1 tablespoon plus 1 teaspoon) golden syrup
25g (1 tablespoon plus 1 teaspoon) butter (we use salted butter)


Place dates and water in a small saucepan over high heat. When the mixture starts to boil, add bicarbonate of soda and 60g butter, and remove from the heat. Stir and then set aside for 25 minutes (the butter will melt during this time).

Preheat oven to 180 degrees Celsius (160 Celsius fan-forced). If you are not using a fan-forced oven, adjust the oven rack to the lower half of the oven so the top of the pudding will be in the centre of the oven.


Grease a 20cm diameter (top inside measurement) round springform pan and line the base and side with baking paper.


Place cooled date mixture in a food processor. Pulse mixture a few times to form a chunky paste.


Add eggs and vanilla to date mixture and pulse a couple of times until just combined.
Stir flour and 150g (2/3 cup, firmly packed) brown sugar together in a medium bowl. Use the back of the spoon to break up any lumps of brown sugar. Add date mixture to the flour mixture and gently fold the ingredients together until just combined.

Pour batter into prepared pan.

If, when baking, the pudding starts to overbrown, loosely cover it with greaseproof paper.


Begin making the sauce (see instructions below) about 10 minutes before the pudding has finished baking.


Bake the pudding for about 50-60 minutes, or until it springs back when lightly pressed in the centre. A thin-bladed knife or wooden skewer inserted into the centre of the pudding should come out without any batter attached.


Leave pudding in the pan and allow it to cool for 10 minutes on a wire rack. Using a skewer, pierce several deep holes in the pudding. Pour about 125ml (1/2 cup) of the hot butterscotch sauce over the pudding. Allow to stand for 5 minutes before removing from the pan.


Reheat sauce if necessary. Serve pudding with hot butterscotch sauce and vanilla ice cream.


Store leftover pudding and sauce in the refrigerator or freezer (we freeze the sauce separately). Suitable to reheat.


Butterscotch Sauce

Place sauce ingredients in a small saucepan. Stir mixture over medium to medium-high heat until the mixture comes to the simmer. Reduce heat and simmer for 5 minutes, stirring occasionally.


Remove sauce from heat and set aside until required. 


maple glazed crispy bacon

bacon bacon bacon bacon bacon bacon bacon bacon bacon bacon bacon bacon bacon bacon bacon bacon bacon baconbacon bacon bacon bacon bacon bacon bacon bacon bacon bacon bacon bacon bacon bacon bacon bacon bacon bacon bacon bacon bacon bacon bacon bacon bacon bacon bacon bacon bacon bacon bacon bacon bacon bacon bacon bacon bacon bacon bacon bacon bacon bacon bacon bacon bacon bacon 
That is all I have been thinking about these few days.
A good friend of mine gave me this mind blowing choc a year ago- bacon with choc. And I just love it! sounds weird all together but was amazing! bitter sweet from the choc and salty bacon bits from the bacon was a perfect combo exploding in your mouth!

So I have decided to make crispy bacon instead :)

Maple glazed Crispy Bacon

500 g sliced bacon
4 tbs maple syrup
1 tbs cinnamon

- Preheat oven to 200 C. Mix together maple syrup and cinnamon. I like a lot of cinnamon. I love the smell around the house. 
- Spray oil on rack & Line bacon strips on it. I prefer having the bacon fats drips to the bottom rather then swimming with the bacon. 
-Using a baking brush, glazed the bacon with maple mix. Pop it into oven.
-Every 15 mins continue to glazed the bacon until crisp. I like mine crispy, so I had it in for about 40 mins. 


-Remove bacon from rack and serve it hot! - and with cold cider of course.